How I Migrated My WordPress Site to GitHub Pages
How I Migrated My WordPress Site to GitHub Pages
A step-by-step guide to a brand-new website

I started my first blog in 2010. Using WordPress was obvious at that time. It was a good choice because it’s easy to use and has thousands of themes and plugins. WordPress is an amazing engine, but it has its downsides. It is resource-demanding, and there are many WordPress-related vulnerabilities. One of the possible solutions is putting the whole site behind CloudFront or any other CDN. The CDN scales well and keeps the site safe, but in my case, the blog was only an archive, and I didn’t want to keep my server running. This is the reason why I’ve chosen GitHub Pages.
GitHub Pages is the “poor man’s hosting solution.” It’s free, and you can point your domain to it. The disadvantage is that it can host only static sites, so I had to generate a static site from my WordPress blog.
Fortunately, WordPress can export (Tools/Export on the admin) the whole site’s content into an XML file, so I only had to develop a simple static site generator that generates the content from the export. I choose TypeScript for the development because I’m familiar with it, and there are many cool and easy-to-use JS libs to do it.
First, I had to find a simple, easy-to-use XML parser. After a short Google search, I found fast-xml-parser. This parser creates a JS object tree from the XML that can be easily processed.
Another thing that I needed was a simple template engine. For this purpose, ejs is the best. It’s easy to learn because you can embed your JS into the HTML code, and also fast because, in the background, the engine compiles your template into JS. For small projects, I cannot imagine an easier and better solution.
I had everything I needed, so I developed my small static site generator.
To create the ejs templates, I downloaded the HTML files generated by WordPress and added the ejs tags to them. I created two templates. One for the posts and another for the table of contents.
The structure of the export XML is very easy. It’s an RSS feed that is built from items. Every item has a type (post, attachment, etc.), but I needed only the posts and the attachments. The code looks like this:
(async function () {
    const parser = new XMLParser();
    let wp_export = parser.parse(readFileSync('wordpress-export.xml'));
    let posts = wp_export.rss.channel.item;

    let pinned_posts: any[] = []
    let post_list: any[] = []
    for (const post of posts) {

        // download attachments
        if (post['wp:post_type'] == 'attachment') {
            const url = post['wp:attachment_url'];
            for (const post_meta of post['wp:postmeta']) {
                if (post_meta['wp:meta_key'] == '_wp_attached_file') {
                    const file_path = post_meta['wp:meta_value']
                    const full_path = `wp-content/uploads/${file_path}`
                    mkdirSync(dirname(full_path), { recursive: true });
                    const file = createWriteStream(full_path);
                    http.get(url, (resp) => {
                        resp.pipe(file);
                        file.on("finish", () => {
                            file.close();
                        });
                    })
                }
            }
        }

        // generate post page if it's published
        if (post['wp:post_type'] == 'post' && post['pubDate']) {
            post['content:encoded'] = post['content:encoded'].split(/\r?\n|\r|\n/g).reduce((accumulator: string, currentValue: string) => accumulator + `<p>${currentValue}</p>`)

            const content = await ejs.renderFile("template.ejs", { post: post }, { async: true })
            mkdirSync(`archives/${post['wp:post_id']}`, { recursive: true });
            writeFileSync(`archives/${post['wp:post_id']}/index.html`, content)

            const element = {
                id: post['wp:post_id'],
                title: post.title,
                summary: truncate(post['content:encoded'].replace(/<[^>]*>?/gm, ''), 300)
            }

            if (pinned_post_ids.includes(post['wp:post_id'])) {
                pinned_posts.push(element)
            } else {
                post_list.push(element)
            }
        }
    }

    // generate toc
    pinned_posts.sort((a, b) => { return b.id - a.id })
    let merged_posts = pinned_posts.concat(post_list.sort((a, b) => { return b.id - a.id }))

    // readme.md
    let readme = `
# my-wordpress-blog
This is a backup of my Wordpress blog. (http://lf.estontorise.hu/)


`
    for (const post of merged_posts)
        readme += `[${post.title}](https://thebojda.github.io/my-wordpress-blog/archives/${post.id})\n\n`
    writeFileSync('README.md', readme)

    // index.html
    const content = await ejs.renderFile("template_toc.ejs", { posts: merged_posts }, { async: true })
    writeFileSync(`index.html`, content)
})()
The code iterates on the items and checks their type. If the type is “attachment,” it reads the value of the _wp_attached_file metadata containing the attachment URL and downloads it using the HTTP module.
If the item type is “post” and it is published (pubDate is not empty) then generate the page. The page content is in the content:encoded tag in HTML format with a little twist. Every line is a separate paragraph, so you must convert the line breaks into paragraphs. The following line of code does this:
post['content:encoded'] =
  post['content:encoded']
  .split(/\r?\n|\r|\n/g)
  .reduce((accumulator: string, currentValue: string) =>
    accumulator + `<p>${currentValue}</p>`)
Ten years ago, when I started my blog, I knew nothing about SEO, so the post links look like this: …/archives/123, where the last number is the post id. In a better case, the post URL is more expressive and contains keywords, but in both cases, you will face the problem that GitHub Pages doesn’t support HTML pages without the “.html” extension.
If you upload an HTML file without an extension, the browser will download it instead of showing it. Because of this, you must convert these URLs into directories containing an index.html file. For example, /archives/123 has to be converted to /archives/123/index.html. With this new structure, everything works like a charm.
The last block of the code generates the ToC HTML and a readme.md file. The second can be very useful if somebody finds your page on GitHub because they can easily navigate to your posts.
When the static page generation was finished, I uploaded my site to GitHub and enabled GitHub Pages in Settings.
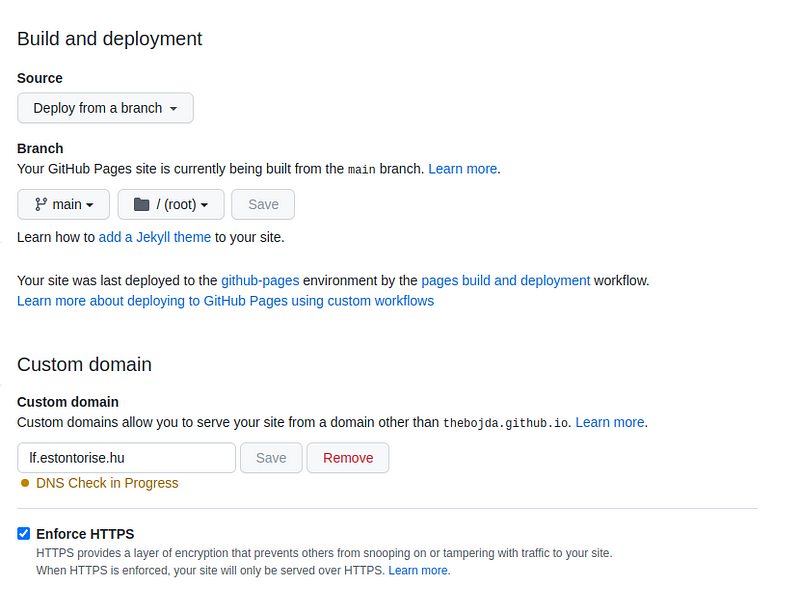
After I set the CNAME record on my DNS provider’s admin, GitHub checked it. By checking the Enforce HTTPS checkbox, GitHub generated an HTTPS certificate, and after a little while, the site was ready. Here you can watch the result: https://lf.estontorise.hu. The blog is in Hungarian, so you probably won’t understand the content, but you can see that everything works well, and the URLs are the same as the WordPress URLs.
As I wrote, this blog is only an archive, and I don’t plan to create new posts, but if I wanted, I could install my WordPress engine on my local machine, write new posts, and update the newly generated pages in the repo. So if you want to use WordPress for blogging and GitHub for hosting the pages, it is also possible.
This was my short journey from WordPress to GitHub Pages. I hope this short article can help you migrate your blog if you want.
(You can find everything in my GitHub repo.)